
GlareOne shows no signs of slowing down and in 2025 has built a complete battery-powered flash system. After the successful launches earlier this year, it was time to bring out the heavy hitters: the Botis 400 and Botis 600. I took them to a sports photo shoot in a gym hall. How did they perform in real-world conditions? See for yourselves!

I have been working with GlareOne almost since the very beginning of the company, strongly supporting their growth, as they offer genuinely excellent products at very reasonable prices. I was genuinely surprised by how well the Vega 400 flashes perform despite their almost absurdly low price, while the Apus 48 and 80 models, as well as the Botis 200, are truly solid, compact lights—perfect for photographers starting their journey with flash.
Now GlareOne has taken things a step further by introducing truly serious tools: the Botis 400 and Botis 600. These new models complete the lineup, making it possible for almost any photographer to find everything they might need within a single, cohesive lighting ecosystem.
About the new GlareOne Botis 400 and Botis 600 flashes

Two new flash units and a trigger have joined the brand’s portfolio. The Botis 400 and Botis 600 are twin designs that share most of their specifications, differing primarily in output power, battery performance, and the modeling light—rated at 40 W in the more powerful model and 30 W in the smaller one. Let’s take a closer look.
The lights feature a classic, elongated body with a large open flash tube at the front, a rear-mounted battery, and a side control panel. The more powerful unit weighs just under 2,800 grams including the battery, which means that despite its high output, it remains relatively lightweight. This does not come at the expense of build quality, which is impressively high. The lights are equipped with a solid, toothless stand mount, allowing for precise angle adjustment. Even with large and heavy light modifiers attached, the head holds its position securely.
At the front, a large open flash tube is used—something photographers working with big umbrellas, softboxes, or parabolic reflectors will truly appreciate. A protective dome is included to shield the flash tube from accidental damage. The units also feature bi-color modeling lights with a color temperature range of 2700–6500 K. This is a major advantage for hybrid shooters, as it makes it much easier to match camera settings for both stills and video when the flash and modeling light share a similar color temperature.


The lights feature a Bowens mount and come supplied with a dedicated reflector, which is additionally equipped with a magnetic filter attachment—an excellent and very practical solution.
On the side of the unit, you’ll find a touch-sensitive control panel. After years of working with more traditional interfaces, it does take a moment to get used to, but after about an hour of hands-on use everything became clear and intuitive. The screen is large and highly responsive. Next to it are the power switch, a lock button, and a test button. That said, I did miss a physical control dial, which would allow for faster adjustment of certain parameters—but that’s likely just a matter of habit.
A very welcome addition is the LED indicator showing the selected group, with each group assigned its own color. After a short period of inactivity, the lamp displays the group letter across the entire screen in its assigned color. It’s a small detail, but a very pleasing one. If that indicator LED were also placed on the opposite side of the lamp, I’d be completely satisfied.


The rear of the unit is occupied by the battery—importantly, the same battery is used in both models. At full power, the Botis 600 delivers approximately 380 flashes, while the Botis 400 manages around 500. The battery charge level can be monitored directly on the lamp’s display, and it’s great to see that the units can operate both on battery power alone and while connected to mains electricity. This makes them a truly versatile solution, suitable for both outdoor shoots and full-day studio sessions, without the need to purchase additional power adapters.
Naturally, the lights are equipped with modern HSS and TTL systems, offering flash synchronization up to 1/8000 s and automatic flash exposure metering. In addition, the units feature the EasyCap masking system, which proves especially useful for product photography compositing.
The lights are also fitted with an active cooling system, allowing for long continuous bursts at full power without the risk of overheating—up to 180 flashes in a single series. This is a crucial advantage, as some competing units tend to throttle much sooner. Another strong point is the impressively short recycle time of just 0.9 seconds at full power. And speaking of power, output can be adjusted across a full 10-stop range, which will certainly be appreciated by photographers working with very shallow depth of field.


The entire kit is housed in a robust carrying case that accommodates all included components. The Botis 400 fits inside fully assembled—complete with battery and reflector attached. In the case of the Botis 600, the battery needs to be detached before transport.
Another new addition is the Talos trigger, which is built around an elegant, full-color touchscreen interface. It takes a moment to get used to, but more traditional users will appreciate the inclusion of a responsive control dial for navigating between groups and adjusting power levels. The display is large and highly legible, and the trigger itself allows access to even advanced settings, such as modeling light output and color temperature.


A huge advantage is its multi-system compatibility. By purchasing a single device, we get full compatibility with Canon, Nikon, Fujifilm, Lumix, and OM System cameras. Sony users are offered a separate version due to the different hot shoe design. Still, for photographers working with multiple systems—or those running workshops or rental studios—this means there’s no need to invest in several different triggers, keeping a bit more money in your pocket.
How did I plan the shoot?

When Marek from GlareOne reached out to me, I needed a moment to think about a shoot that would truly showcase the new Botis lights. Outside, the weather was grey, gloomy, and cold, and together with GlareOne we had already produced content in a hair salon, a rented cabin, and a furniture showroom. Then the idea clicked—a sports shoot in an indoor facility. I remembered how many messages I received from my followers when I carried out a similar shoot for a client last year.
Of course, when working on a commercial shoot, there’s usually no room to also record a video showing how such images are created, so I decided to do exactly that as part of this collaboration. It turned out to be a perfect call.

Next, everything had to be carefully planned. I started with finding the right sports hall. I contacted several venues, but the best option turned out to be the gym at IV High School in Wrocław, just a five-minute walk from my place. The hall itself is genuinely attractive, and most importantly, it features a wooden parquet floor instead of the typical blue or green surface. On top of that, it has large windows and visually pleasing railings on the opposite side—another perfect hit.
The next step was reaching out to Olga, whom I’ve worked with many times before. She’s an incredibly positive person with sport truly running through her veins. Once again, I couldn’t have made a better choice.
The final part of the preparation involved styling. I decided not to force a specific sport look, but instead to go for a more fashion-oriented take on sportswear. That’s why most of the outfits come from the Adidas Originals collection, which perfectly blends athletic aesthetics with fashion. After all, I personally own quite a few pieces from that line. Everything was ready—time to start shooting!
Set number 1 – classic sports look

When browsing the portfolios of established sports photographers, you’ll almost always come across similar images: strong, contrasty front light, two colored rim lights, and a touch of smoke. Olga wore a light-colored outfit, which captures color far better than, for example, black. I selected the colors and started metering the light—blue and pink, a combination I’ve always liked.
The key light was a Botis 600 paired with a silver ORB 110 umbrella. The umbrella itself produces a fairly wide beam with a pleasant, contrasty character. The rim lights were provided by two Botis 400 units fitted with the aforementioned color filters. I really appreciated the magnetic mounts, as they eliminated the need to tape the filters in place. It’s important for the lights to deliver a similar amount of output, but one has to remember that different filters have different densities. In practice, this meant that the unit with the blue filter had to be set about 1 EV stronger than the one with the pink filter.
Metering the light was no longer that straightforward. Why? The ceiling lights made things more complicated, and we couldn’t turn them off because we were recording video throughout the entire shoot. At the same time, I wanted to work at an open aperture of f/2.0, and on top of that, I didn’t want to rely on HSS, as it reduces flash output—and if there’s no real need for it, I simply avoid using it.

This is where neutral density filters came to the rescue, so I used an ND8. It allowed me to suppress the ambient light and work comfortably at f/2.0 and 1/200 s without the need to use HSS. If you’re planning to create similar images, I can definitely recommend bringing ND filters along.
Once everything was set up, I turned on a large smoke machine, waited for the smoke to settle slightly, shot a short series, and that was it. The key is to place the smoke between the model and the rear lights. Additionally, if the model sits down on the floor, the lights should be lowered accordingly—but overall, creating shots like this is incredibly straightforward.


Set no. 1.5 – similar setup, different colors

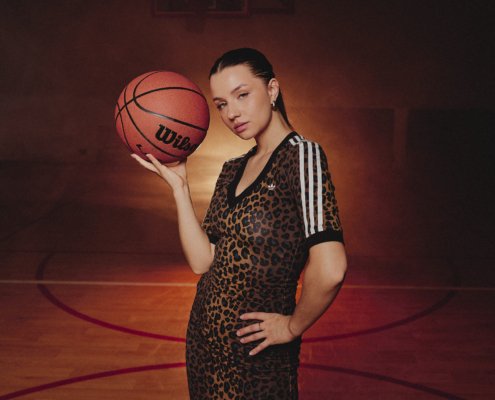
I also brought along a leopard-print dress for the shoot, which didn’t really work color-wise with blue and pink. Instead, I decided to prepare a similar setup in a monochromatic style, using just two lights.
The key light—with the Botis 600 as the main source—remained unchanged, but I removed one rim light and repositioned the other on a small GlareOne Alki stand. I added an orange filter and placed it behind Olga. I introduced plenty of smoke, shot a short series, and that was it. Even easier to execute and requiring less gear.


Whenever I have the opportunity, I love placing lights outside the window. It’s a guaranteed way to add depth and a distinctive character to the light. The rented gym had beautiful, large windows and plenty of space to position a light outside. Ideally, I would have placed all three lights there, but I only had one stand tall enough for that setup. Still, it was more than enough to achieve interesting results. Outside the window went the Botis 600 fitted with the Longbow reflector.
Compared to a standard reflector, this dish produces a beam spread of around 45 degrees instead of 70, which makes a big difference in this type of setup. I positioned it several meters away from the window to better emphasize the shadows cast by the window frames.
This time, I focused more on experimenting with different compositions, so we shot quite a few frames near the railings as well as in the middle of the hall, with the railings in the background. Since the light was positioned far away, its intensity remained very similar regardless of whether Olga was slightly closer to or farther from the window (it’s worth reading up on the inverse square law!).
Olga was wearing the final outfit, which—like the previous ones—combined sportswear with a fashion-forward aesthetic.
As for light metering, I once again worked with the same settings: 1/200 s, f/2, ISO 100, plus an ND8 filter. The flash was running at full power. However, if you’re working with a less powerful light, there’s no need to worry. Simply turning off the ceiling lights, removing the ND filter, and setting ISO to 400 or 800 would be enough for even a Botis 200 to handle the job with ease—provided it’s dark outside.


Set no. 2.5 – still lit from outside the window, but backlit with smoke

The previous shots were taken using just a single light, with the illumination coming either from behind or from the side. Once the room was filled with smoke, it almost demanded to show how the light interacts with it.
However, when Olga stood in front of the windows, her front side was completely underexposed, so some fill light was necessary. I reached for a Botis 400 with a silver umbrella and simply added a touch of light from the front. A few frames later, the setup was done.


In a shoot like this, I couldn’t afford to skip any element—if Olga had been posing in jeans and a sweater, the whole concept simply wouldn’t have worked. On the other hand, even with perfect styling, relying solely on ceiling lights would have resulted in weak images. That’s why, when planning similar shoots, make sure not to overlook any part of the equation.

The new GlareOne lights passed the test with flying colors! I really appreciated their fast recycle times, short flash durations, efficient batteries, and powerful modeling lights. In conditions like these, battery-powered flashes offer convenience, versatility, and much faster changes between lighting setups. On the other hand, if I were to shoot a session like this all day long, there’s nothing stopping me from simply plugging them into mains power. I also appreciated the group indicator LED displaying the group letter, as well as the efficient cooling system—despite shooting fairly long bursts at high power, the lights never once overheated. Great job, GlareOne!
Jakub Kaźmierczyk

My name is Kuba Kaźmierczyk and I have been working professionally as a photographer for over 10 years. Photography accompanies me every single day—both during my commissioned work and in my free time. I strive to be a versatile photographer, which is why my portfolio spans many different fields of photography. Commercially, I mainly work with companies, creating imagery for advertising campaigns. I have worked, among others, for brands such as Renault, Dacia, Lexus, Grycan, Pizza Hut, KFC, Burger King, Eurobank, Shopee, Acer, Olympus, and many others.
My work includes interior, product, lifestyle, and food photography. Outside of commercial assignments, I focus on portrait and fashion photography—this is where I find the greatest pleasure and satisfaction, especially when creating well-thought-out shoots with distinctive styling. I increasingly reach for analog cameras, which allow me to reconnect with the roots of photography. I enjoy challenging myself and exploring new areas such as underwater and drone photography. During my travels, I observe the vibrant life of cities, photograph landscapes, food, and local communities.
My second major focus is photography education—both in-person and online. I actively run my social media channels, produce videos for my YouTube channel, and contribute to educational content for the eduweb.pl platform. Recently, I have been developing the photography section of the ahoy.so platform—a community for photographers—where I create numerous educational tutorials. I also host live streams, during which I conduct photo shoots, edit images, and provide business advice.
I also collaborate with many companies from the photography industry—leaders in their respective fields. Mutual support and recognition of my work are extremely important to me, as they allow me to create behind-the-scenes materials from photo shoots and demonstrate equipment in real-world use. I work with Peak Design as well as brands such as GlareOne, Canon, OM System, Eizo, Wacom, Manfrotto, Acer, Nvidia, WD, and SanDisk.
Read more articles
 https://glareone.eu/wp-content/uploads/2025/12/030_KA519858_Olga_Social.jpg
1366
2048
Kamila Przyjemska
http://glareone.eu/wp-content/uploads/2024/04/logo-glareone.png
Kamila Przyjemska2025-12-22 10:52:262025-12-22 13:40:35GlareOne Flash Lights in a Sports Photo Shoot – Have the Botis 400 and Botis 600 Changed the Game?
https://glareone.eu/wp-content/uploads/2025/12/030_KA519858_Olga_Social.jpg
1366
2048
Kamila Przyjemska
http://glareone.eu/wp-content/uploads/2024/04/logo-glareone.png
Kamila Przyjemska2025-12-22 10:52:262025-12-22 13:40:35GlareOne Flash Lights in a Sports Photo Shoot – Have the Botis 400 and Botis 600 Changed the Game?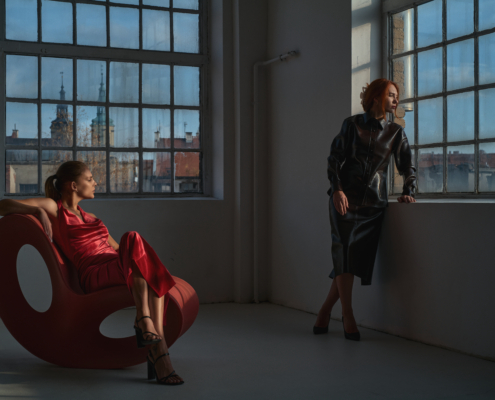 https://glareone.eu/wp-content/uploads/2025/12/Glare-One-12-1-scaled.jpg
1708
2560
Kamila Przyjemska
http://glareone.eu/wp-content/uploads/2024/04/logo-glareone.png
Kamila Przyjemska2025-12-19 13:52:462025-12-19 14:39:25Conscious lighting in photography – combining flash power with LED subtlety
https://glareone.eu/wp-content/uploads/2025/12/Glare-One-12-1-scaled.jpg
1708
2560
Kamila Przyjemska
http://glareone.eu/wp-content/uploads/2024/04/logo-glareone.png
Kamila Przyjemska2025-12-19 13:52:462025-12-19 14:39:25Conscious lighting in photography – combining flash power with LED subtlety https://glareone.eu/wp-content/uploads/2025/12/dz0zMDAwJmg9MjIwNA_src_240555-Clipboard2-scaled.jpg
1881
2560
Kamila Przyjemska
http://glareone.eu/wp-content/uploads/2024/04/logo-glareone.png
Kamila Przyjemska2025-12-17 12:04:232025-12-17 13:22:48New player in the flash market – GlareOne Botis 80 and Botis 200
https://glareone.eu/wp-content/uploads/2025/12/dz0zMDAwJmg9MjIwNA_src_240555-Clipboard2-scaled.jpg
1881
2560
Kamila Przyjemska
http://glareone.eu/wp-content/uploads/2024/04/logo-glareone.png
Kamila Przyjemska2025-12-17 12:04:232025-12-17 13:22:48New player in the flash market – GlareOne Botis 80 and Botis 200